Snapmaker orca 3D printer slicer
Prepare detailed prints with tuned Snapmaker profiles, precise color tools, and connected-machine control in one focused workspace.
Open-source OrcaSlicer workflow • Windows, macOS, and Linux • Official download source
Built for the print room
What is Snapmaker Orca?
Snapmaker Orca is a desktop 3D printer slicer from Snapmaker. It turns a 3D model into printer-ready G-code, then gives you a practical place to review the plate, choose materials, and send the job to a connected machine.
A familiar slicer with Snapmaker details in the right places
Snapmaker Orca builds on the open-source OrcaSlicer project and is tuned for Snapmaker printers, with the Snapmaker U1 as its current focus. Import STL, 3MF, STP, STEP, AMF, or OBJ files, arrange the plate, select a printer and filament profile, and slice when the setup looks right. The beta also works with a wider range of third-party printers through OrcaSlicer’s existing support.
The software is aimed at people who want more control than a basic print button provides. Hobbyists can paint color zones and prepare multi-color jobs. More experienced makers can adjust process settings, export G-code for removable media, or send a finished job over a local or wide-area network. Snapmaker publishes the project, release notes, and documentation through its website, GitHub, and wiki.
That makes Snapmaker Orca useful at two points in the same routine: before the print, when a model needs careful placement and material choices, and during the print, when a quick status check saves a walk to the machine. It is still beta software, so support varies by printer. The U1 gets the most attention today, while Artisan, 2.0, J1, and J1s compatibility continues to grow.
A typical session is easy to understand. Load a model, check the build plate, pick the machine and filament, then inspect the estimated time and material use before slicing. If the job looks good, export the file or upload it to the printer. The same workspace keeps model placement, filament assignment, process settings, and device status close together, which is useful when a print needs a small change instead of a complete restart.
Features that keep the work in your hands
Snapmaker Orca brings an Orca Slicer workflow together with Snapmaker-focused profiles, color tools, and printer controls. Set up a plate, check the result, then send the job when it looks right.
Multi-color painting
Multi-material setup
Full Spectrum beta
Tuned filament profiles
Wide file support
Precise path planning
WAN and LAN sending
Remote monitoring
Multiple printer control
Local G-code export
Check your setup
System requirements for Snapmaker Orca
Snapmaker Orca runs on common desktop hardware. The figures below come from Snapmaker’s U1 quick start guide and cover the beta slicer’s baseline needs.
| Component | Minimum | Recommended or practical guidance |
|---|---|---|
| Operating system | Windows 10 or later; macOS 12.0 or later; Ubuntu 20.02 or later; Fedora 36 or later. | Use a supported 64-bit desktop installation. Linux builds are provided through GitHub. |
| Processor | Intel Core 2 or AMD Athlon 64 at 2 GHz or faster. | A newer multi-core desktop CPU will feel better when loading larger models or preparing several plates. |
| Memory | 4 GB RAM. | 8 GB RAM is recommended by Snapmaker for regular slicing work. |
| Graphics | OpenGL 2.0 support. | Keep current graphics drivers installed, especially when working with detailed 3D previews. |
| Storage | At least 2 GB of available disk space. | Leave extra room for projects, exported G-code, cached models, and future software updates. |
| Network | No connection is needed for local export. | Snapmaker Orca needs a working WAN or LAN connection for printer binding, remote monitoring, and sending jobs. |
Snapmaker Orca is currently optimized for the Snapmaker U1. Compatibility for Artisan, 2.0, J1, and J1s is being expanded. For a removable-media workflow, slice in Snapmaker Orca and export the G-code locally.
Choose your build
Download Snapmaker Orca
Snapmaker Orca is a free beta slicer for preparing models and sending print jobs to supported Snapmaker machines. Version 2.3.5 adds top cover controls, filament sync, an official filament color library, and updated PVA, PLA-CF, and TPU profiles. Pick the package that matches your computer, then follow the installer steps.
The download includes the desktop slicer, tuned Snapmaker filament profiles, and the tools used to prepare 3MF, STL, STP, STEP, AMF, and OBJ files. After slicing, you can export G-code for a USB workflow or send a job over LAN or WAN when your printer and account are configured.
For a first install, allow at least 2 GB of free storage and use a machine with a 2 GHz processor or faster. The app is still in beta, so check the release notes and printer compatibility before starting a long print.
Windows
Installer for Windows 10 and later. This is the standard setup package for most PCs.
macOS
Universal package for macOS 12 and later. It supports both Apple silicon and Intel Macs.
Linux
Ubuntu 24.04 ZIP build for 64-bit systems. Flatpak packages are listed in the release assets.
Safe, open-source distribution
These files come from the Snapmaker Orca GitHub release published by Snapmaker. Review the release notes if you are updating an existing install. Linux users can also choose Flatpak builds from the same release. Keep the installer file until the app opens and your printer profile loads correctly.
Snapmaker Orca is currently optimized for Snapmaker U1. Support for other Snapmaker machines is being expanded. The quick start guide lists Windows 10 or later, macOS 12 or later, Ubuntu 20.04 or later, Fedora 36 or later, 4 GB minimum RAM, and OpenGL 2.0 support.
See Snapmaker Orca in action
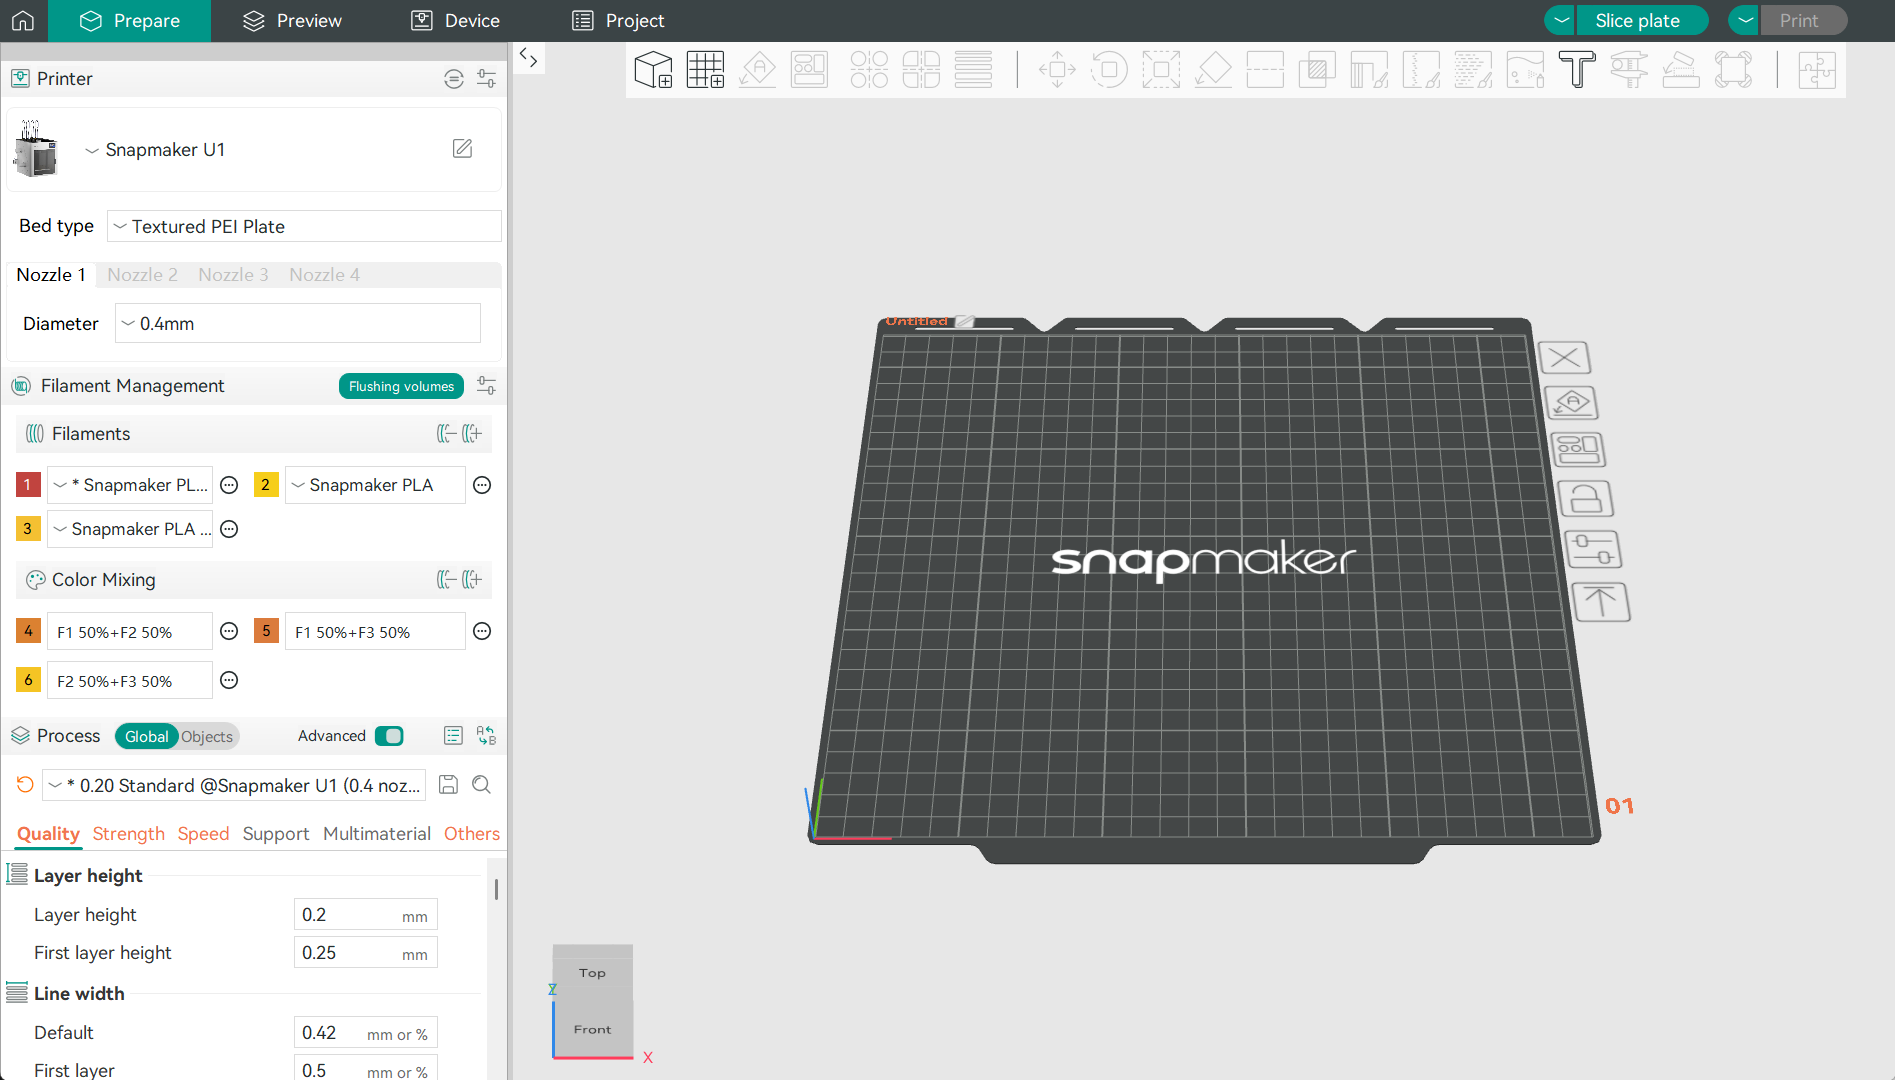
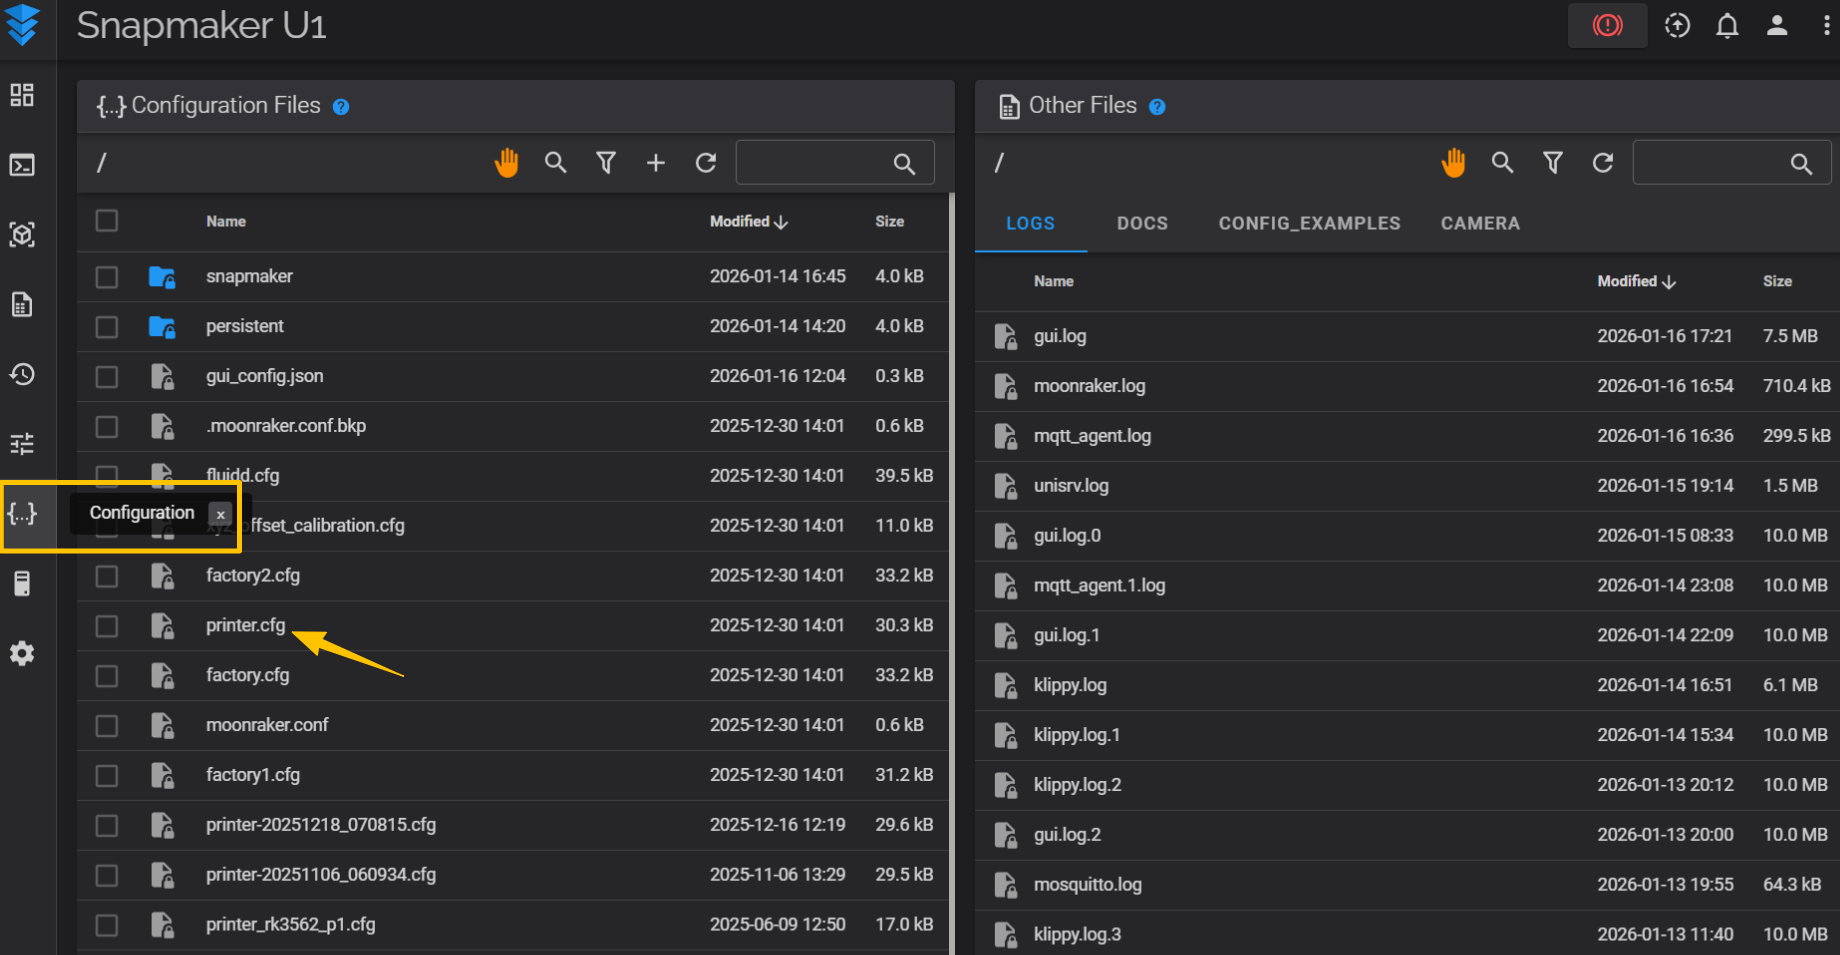
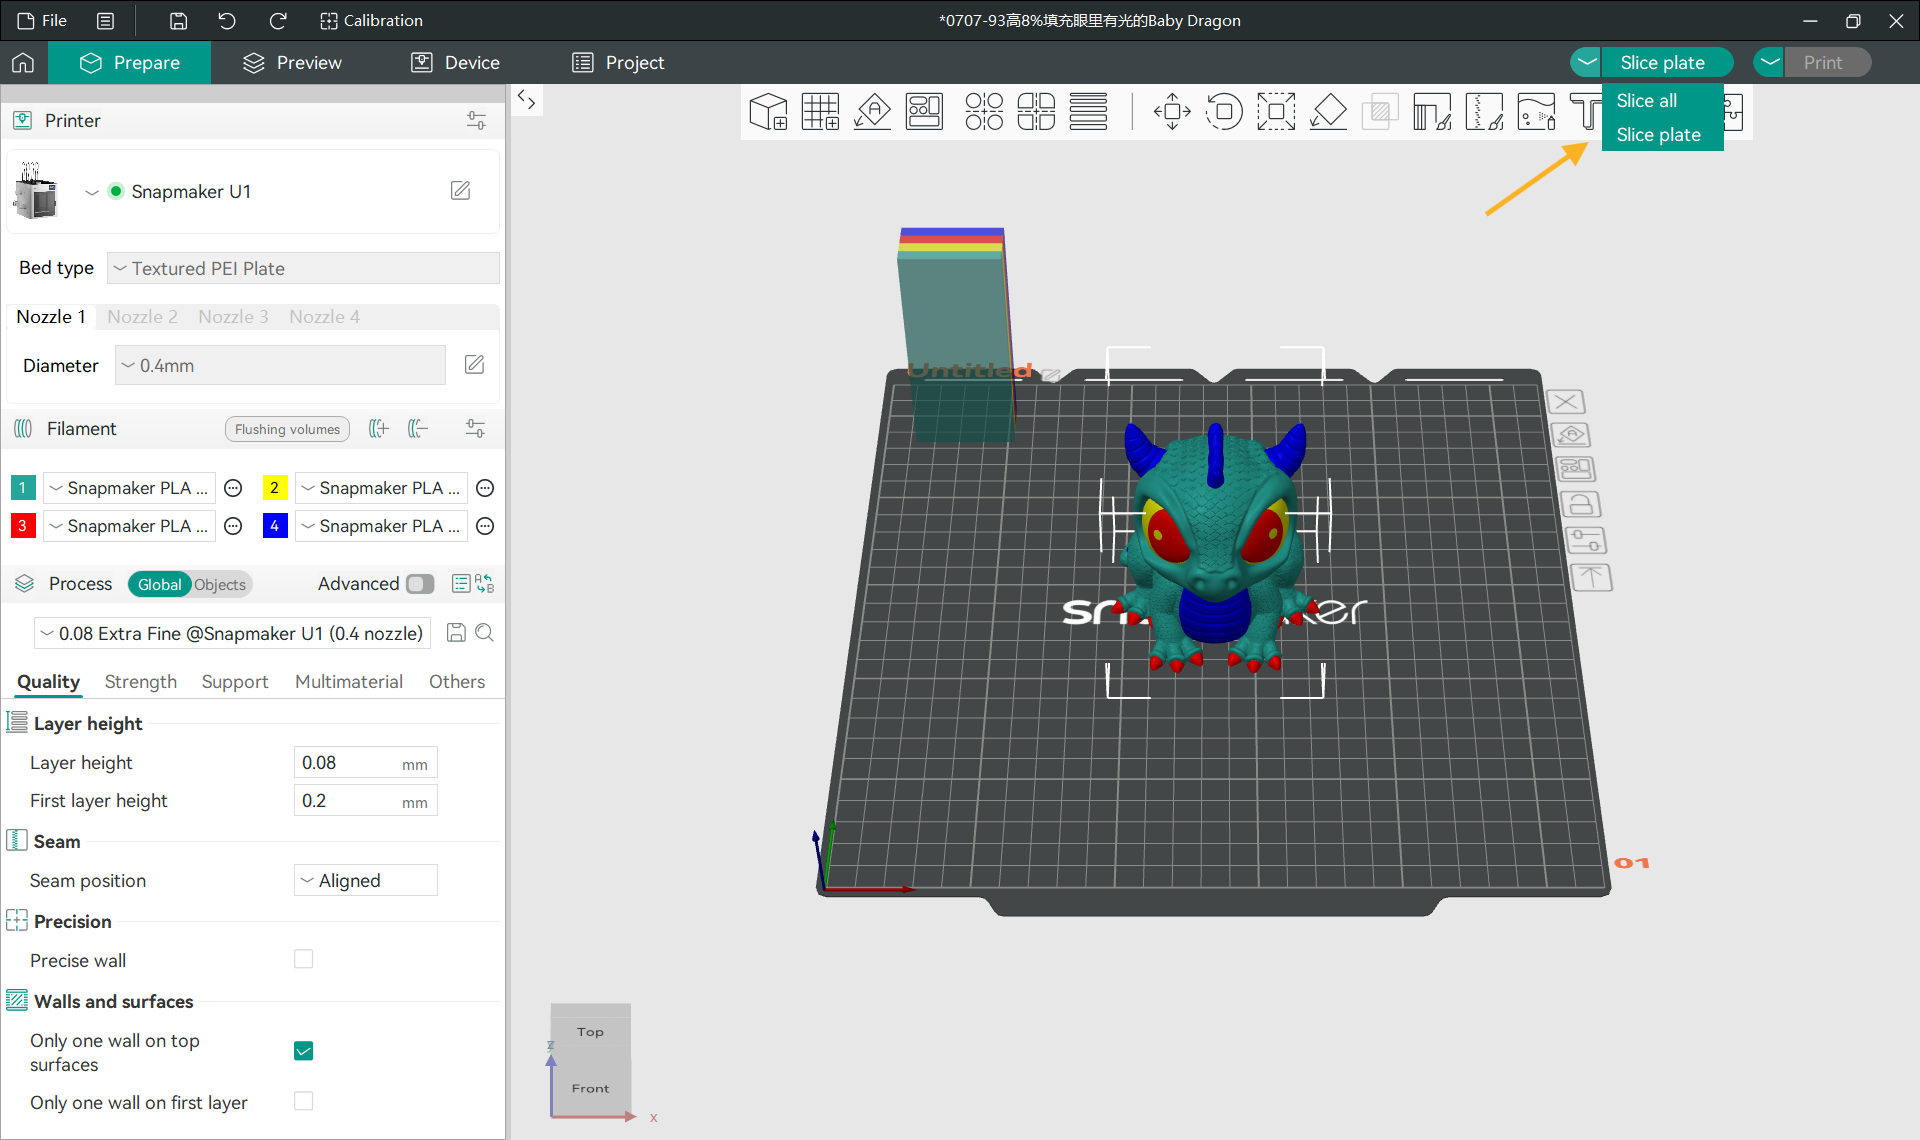
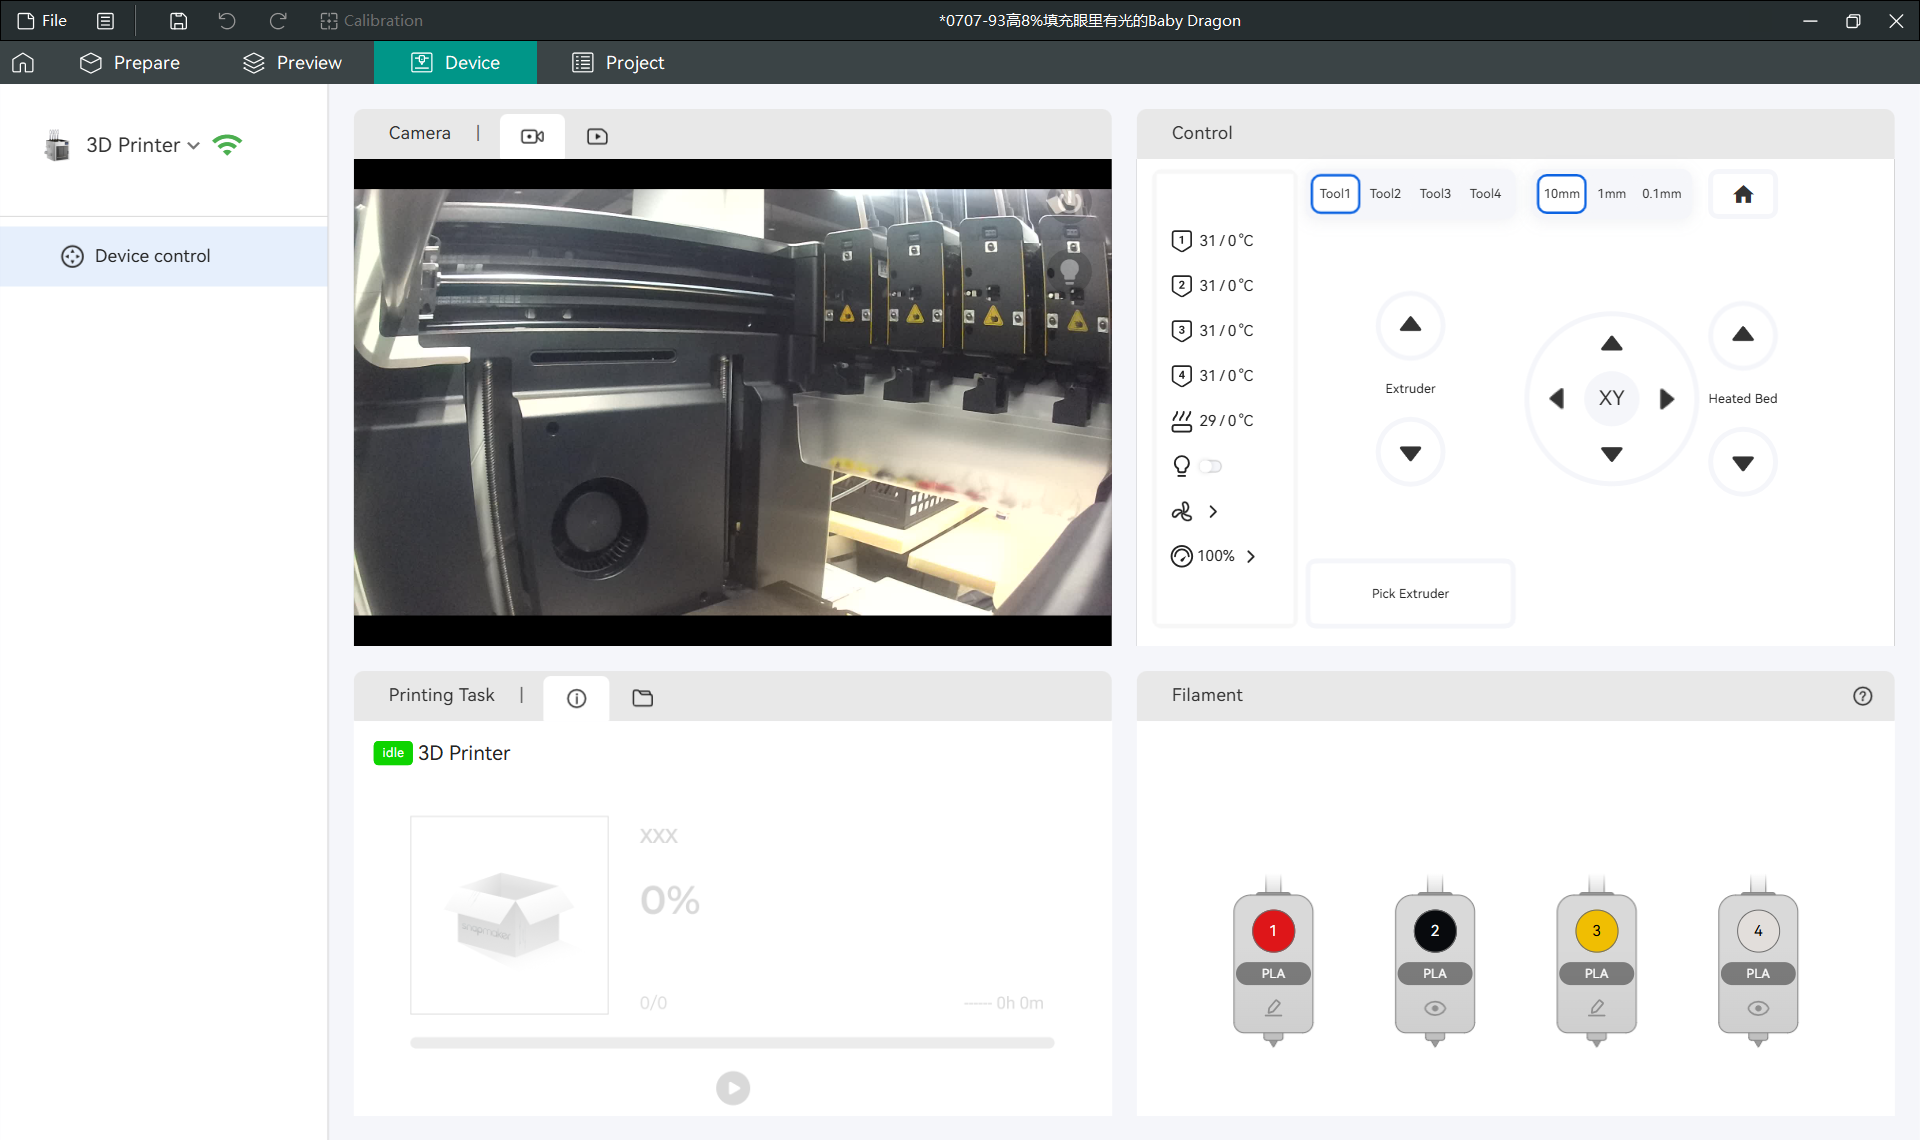
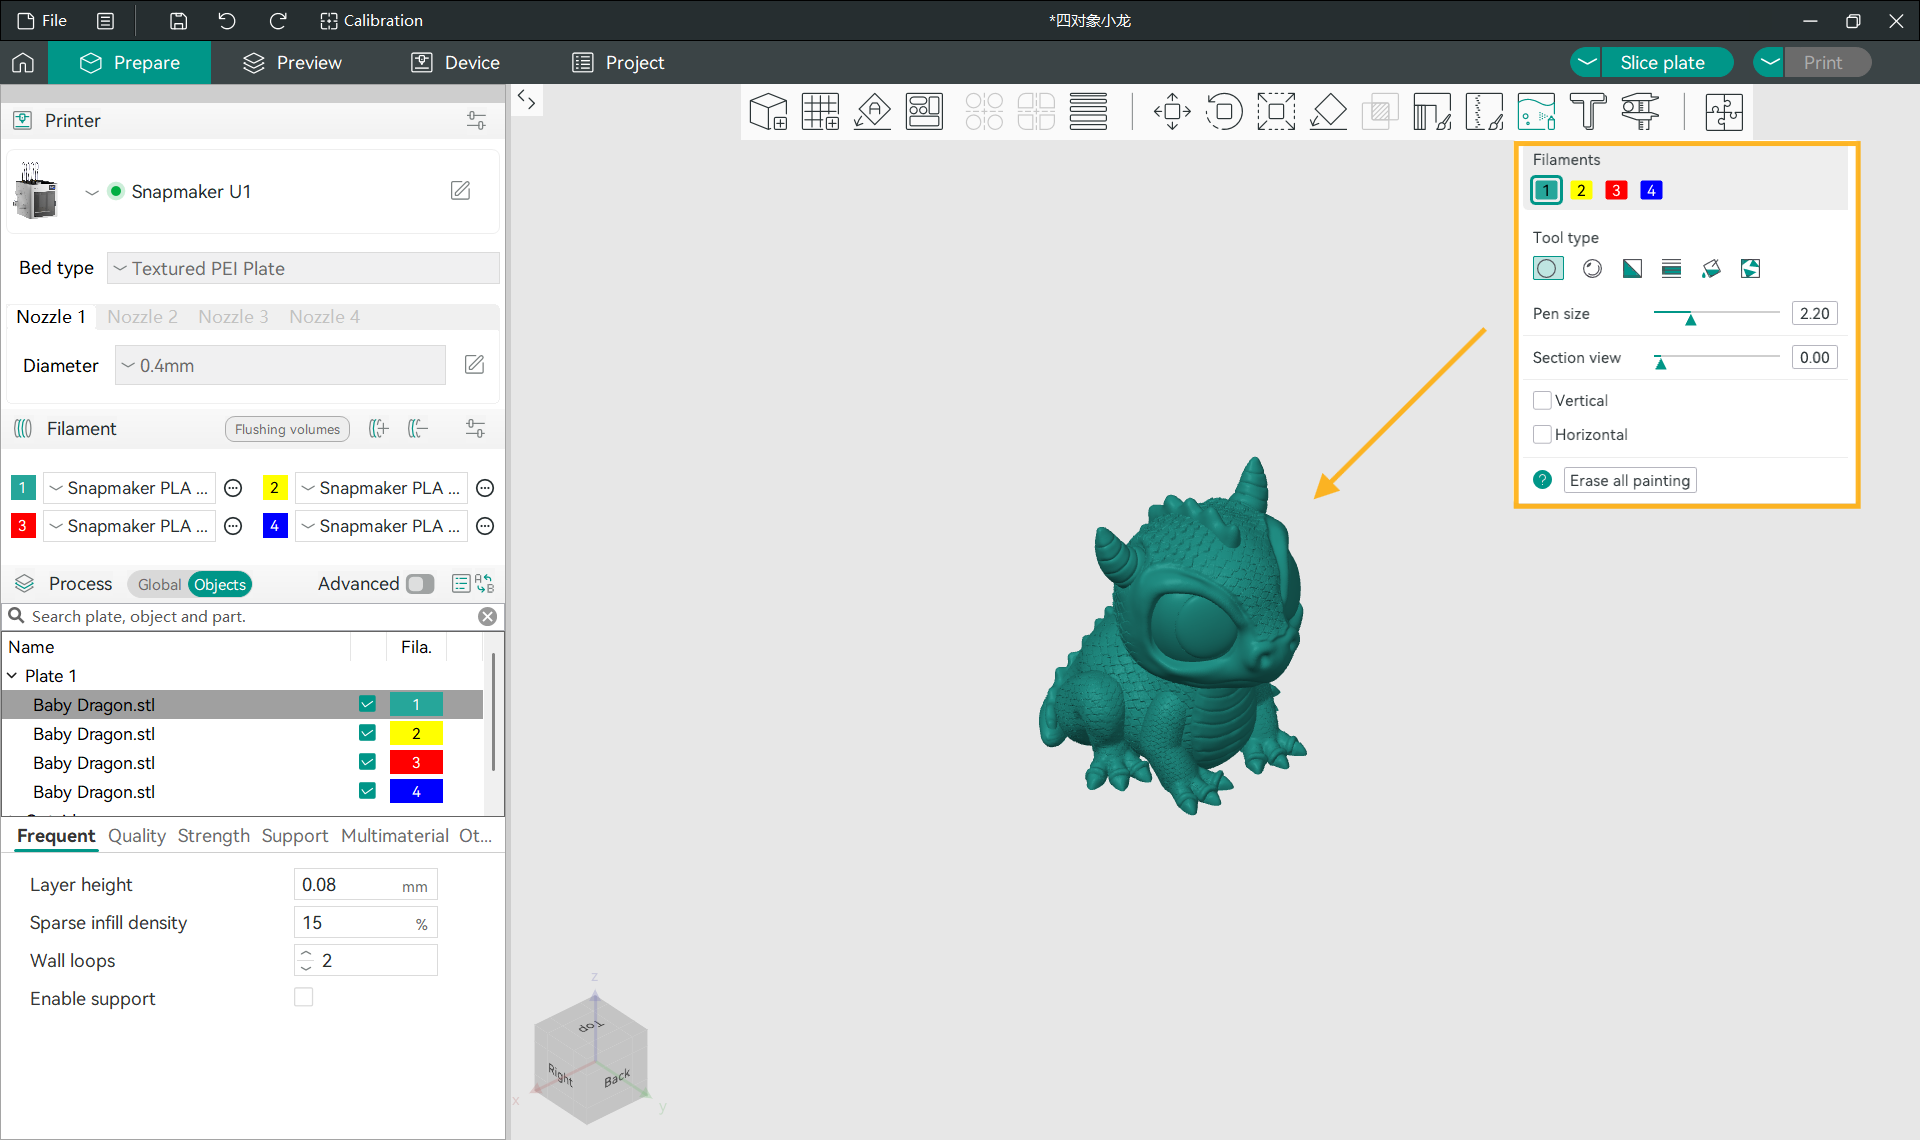
These Snapmaker Orca screens show the real path from model setup to device control. Click any image to open a larger view of Snapmaker Orca.
Start here
Getting started with Snapmaker Orca
The first print feels much easier when the setup is done in the right order. Use this guide to install Snapmaker Orca, pick the correct profiles, connect a printer, and send a first sliced job without guessing at every menu.
Downloading Snapmaker Orca
Start at the Snapmaker Orca download section on this page. It points to Snapmaker’s official product page, which is the right place to check the current release and its notes. The release listed in the project research is v2.3.5, but check the page before installing because installer names and supported devices can change.
For a normal project, choose the stable build. A beta build can expose newer printer support or color tools, but it is a poor choice when you need a predictable production run. On Windows, most modern computers should use the 64-bit build. A 32-bit build only makes sense on an older 32-bit operating system. Windows downloads may arrive as an .exe installer, an .msi package for managed deployment, or a portable .zip archive. The installer creates shortcuts and registers the app; portable mode runs from an extracted folder and is useful when you cannot install system-wide.
macOS uses a .dmg disk image. Linux users should select the build that matches their distribution, such as .AppImage or a package supplied in the release assets. The U1 guide lists Windows 10 or later, macOS 12 or later, and Ubuntu 20.02 or Fedora 36 or later. Keep at least 2 GB free, and aim for 8 GB of RAM when working with large or multicolor models.
Installation walkthrough
Close other slicers before you begin. Snapmaker Orca can live beside OrcaSlicer or Luban, but a clean first launch makes it easier to tell which printer and material profiles belong to this installation.
- Open the downloaded installer. On Windows, approve the User Account Control prompt and choose the install location. The default folder is fine for most users.
- Read the license prompt, then choose whether to create a desktop or Start menu shortcut. An administrator can use an
.msipackage with the normal Windows deployment tools. - On macOS, open the
.dmg, drag Snapmaker Orca into Applications, and launch it from there. If macOS asks for confirmation because the app came from the internet, confirm that you downloaded it from the official source. - On Linux, extract a portable archive or make the AppImage executable. A typical terminal command is shown below. The exact filename will match the release you downloaded.
chmod +x Snapmaker_Orca*.AppImage
./Snapmaker_Orca*.AppImage
The first launch may take longer while the application creates its profile folders and loads printer presets. Do not import a project until the setup wizard finishes. If the app opens with a blank printer list, reopen the printer selector after the initial sync or add the printer from the settings menu.
Initial setup and configuration
Snapmaker Orca opens with a setup wizard on first use. Pick the login region that matches the account and printer region, then continue to printer selection. The U1 is the default choice in the current guide. Select the machine, nozzle size, and any other printer you want shown in the working menus. You can change this later from the selector beside Printer, so do not worry about hiding a model by mistake.
Next, choose the filament presets you expect to use. Start with the exact material and color where possible. A tuned PLA profile is a safer first test than a generic profile with a different nozzle temperature. The wizard only controls which presets appear in the short list; it does not prevent you from adding another material later.
Log in if you want cloud device binding, remote monitoring, or Upload and Print. Bind a U1 with a PIN or device search in cloud mode. For a local network with tighter data control, use LAN mode and bind by IP address or nearby-device search. If you are moving from another slicer, import the model files rather than copying every old profile. Recheck bed size, nozzle diameter, filament temperature, and retraction before trusting an imported profile.
How to use the core workflow
Think of the main workflow as model, profiles, preview, then print. Click New Project on the home screen. Import a .3mf, .stl, .stp, .step, .amf, or .obj file with File > Import, the first toolbar button, or drag and drop. The object appears in the central viewport, while the object list helps you select one model when a plate contains several.
Use the top toolbar to move, rotate, scale, cut, or paint the model. For multicolor work, select the painting tool and assign colors to faces or regions. The left side of the workspace keeps object and filament choices close at hand. On the right, select the target printer and nozzle, then choose a filament preset. Open Process settings to adjust quality, strength, speed, supports, and infill. For a first test, keep the default process profile and change one setting at a time.
Click Slice Plate in the upper-right corner. Snapmaker Orca calculates the tool paths and then shows layer preview, estimated print time, filament use, and the color plan. Scrub through layers before printing. Thin walls, islands, unsupported bridges, or a color change in the wrong place are much cheaper to fix here than on the machine.
When the preview looks right, click Print. With a bound printer, choose Upload to transfer the job or Upload and Print to transfer it and start the job. For removable media, choose Export G-code File, copy the file to a USB drive, and start it from the printer touchscreen. The Device view lets you check progress, camera video, temperatures, fan speed, LEDs, and pause or stop controls. Those controls depend on the printer connection, so a local export remains the fallback when the network is unavailable.
New Project -> Import model -> Select printer and filament
-> Choose Process -> Slice Plate -> Preview -> Print or Export G-code
Power-user habit: keep the viewport preview open after slicing and use the layer slider before every unfamiliar print. It catches profile mistakes faster than reading a long settings panel.
Tips and best practices
Save projects with the original model and a short note about the material. A name such as u1_bracket_PLA_0-20mm.3mf is easier to find than final2.3mf. Keep the app, printer firmware, and filament profiles current, but avoid updating immediately before a paid or time-sensitive print. Read the release notes and run a small calibration piece after a large update.
- Large assemblies can slow the viewport. Hide objects you are not editing and close other 3D applications while slicing.
- Check the nozzle, bed size, filament, and first-layer preview every time you switch printers.
- For Full Spectrum beta color mixing, use a supported Snapmaker Orca release and read its compatibility warnings before committing a long print.
- Keep the printer on a stable network for remote jobs. If discovery fails, try LAN binding by IP or export G-code to USB.
- Watch the first layer in person. Remote controls are handy, but they cannot fix poor bed adhesion or a blocked nozzle.
When a setting is unclear, start with the Snapmaker Wiki quick-start guide and the product support pages. The OrcaSlicer GitHub project is useful for release notes and open-source issue tracking. Community discussions can help with unusual profiles, but compare advice with the profile and firmware version on your own machine.
Read the setup guide or jump back to the official download page.
Questions before your first slice?
Answers about setup, supported machines, color workflows, remote control, and common fixes.
What is Snapmaker Orca?
Snapmaker Orca is an open-source 3D printer slicer based on OrcaSlicer. It adds Snapmaker-focused printer and filament profiles to the familiar model preparation workflow. The current release is a beta and is optimized first for the Snapmaker U1.
Where can I download Snapmaker Orca?
Use the official Snapmaker Orca product page for the current download entry point and release information. The page directs PC users to the available builds, while Linux releases are published through the Snapmaker Orca GitHub releases. Check the release notes before installing an older version.
Which operating systems are supported?
The published U1 guide lists Windows 10 or later, macOS 12.0 or later, and Linux distributions including Ubuntu 20.02 or later and Fedora 36 or later. A 64-bit system with OpenGL 2.0 support is expected. Plan for at least 4 GB of RAM and 2 GB of free storage; 8 GB of RAM is recommended.
Which Snapmaker printers work with it?
Snapmaker Orca is currently tuned for the Snapmaker U1, including its multi-color workflow. Support for Artisan, 2.0, J1, and J1s is being expanded, so direct machine features may vary by version. For those machines, review the release notes and wiki before moving an active production workflow.
Can I use third-party 3D printers?
Yes, the OrcaSlicer base supports a broad set of third-party printers and profiles. The level of integration is different from a supported Snapmaker machine, especially for remote controls and device discovery. Confirm the exact printer profile, start G-code, and firmware expectations before printing.
What model files can Snapmaker Orca import?
You can bring in common formats such as 3MF, STL, STP, STEP, AMF, and OBJ. 3MF is useful when a project needs to retain plates, object placement, or more print settings. After import, check scale, orientation, bed position, and any per-object filament assignments.
Does it support multi-color printing?
It includes colorizing and painting tools for assigning colors to model regions. Multi-toolhead workflows can map different materials to separate parts, and path planning can preheat or cool standby toolheads. The Full Spectrum beta feature uses four loaded filaments on the U1 to create a wider range of colors.
What is Full Spectrum printing?
Full Spectrum is a beta color-mixing workflow introduced for the Snapmaker U1. It combines four filaments to produce blended colors rather than limiting a model to four solid inputs. Read the on-screen compatibility warnings because some filament combinations and color-mixing setups are not supported.
Can I slice and print without a network?
Yes, you can slice a plate and export G-code locally for a removable-media workflow. This is a practical option when the printer is offline or isolated from the network. Remote upload and live controls require the relevant printer connection over LAN or WAN.
How does remote printer control work?
After a compatible printer is bound and reachable, Snapmaker Orca can send a sliced job through the network. The device list lets you choose among managed printers, while monitoring reports print progress and machine status. Network permissions, firmware, and account binding all need to be correct.
Why does my printer not appear in the device list?
First confirm that the printer is powered on, connected to the expected network, and signed in or bound to the same account. A VPN, guest Wi-Fi isolation, firewall rule, or outdated firmware can prevent discovery. Restart the app and printer, then compare the connection steps in the Snapmaker Orca wiki.
Why are my colors or filament assignments wrong?
Open the filament mapping and verify that each model region points to the intended toolhead or filament slot. Imported 3MF projects may carry assignments from another profile, so review them after loading the file. For Full Spectrum jobs, check the loaded order and heed any incompatible-combination warning before slicing.
What should I do when slicing fails?
Inspect the model for open surfaces, non-manifold edges, and objects that sit below the build plate. Try repairing the mesh, reducing complex modifiers, or slicing a single object to identify the source. If the problem began after an update, compare the project with a fresh profile and consult the release notes.
Can I use my existing OrcaSlicer profiles?
Profiles may be reusable when the printer, nozzle, filament, and firmware settings match. Back up your existing configuration first, then compare imported values with the Snapmaker profile instead of replacing everything at once. A profile made for a different toolhead or machine can produce unsafe temperatures or motion settings.
Is Snapmaker Orca a replacement for Luban?
It depends on the machine and the work you do. Luban remains useful for Snapmaker 3-in-1 workflows, while Snapmaker Orca is aimed at users who want OrcaSlicer-style slicing and advanced printer control. Compare the supported features for your model before changing a dependable setup.
How is it different from standard OrcaSlicer?
Snapmaker Orca keeps the OrcaSlicer processing foundation and adds profiles and integrations aimed at Snapmaker printers. That includes Snapmaker device management, network printing support, and U1-focused color features. Standard OrcaSlicer may have broader community coverage for a particular third-party printer, so the best choice depends on your hardware.